PROIEXIA · Interactive property presentation
The editor, explained
Every tab, every field and every button on the screen you use to build the presentation — what it does, what it costs, and the order to do things in.
1What this is
Two screens, one set of data.
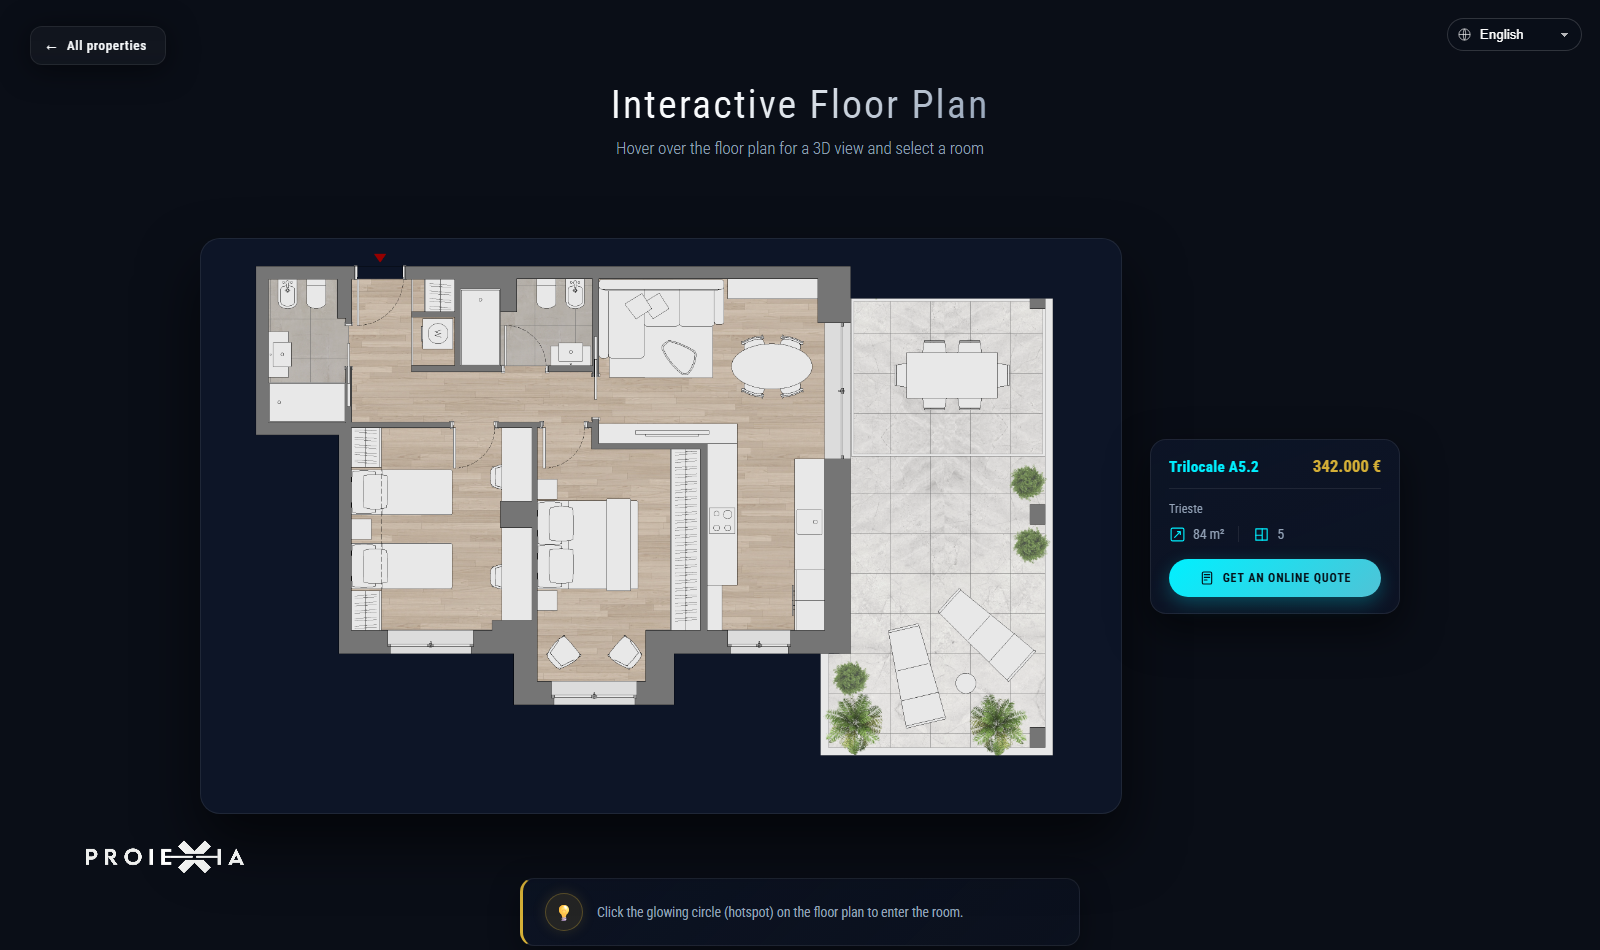
The presentation is what you send to a buyer: floor plans they can click, rooms they can walk into, materials and furniture they can change on the spot. The editor is this manual's subject — the private screen where you build that presentation. Everything a visitor will ever see is typed, uploaded or generated here.
Nothing is installed. The editor is a web page; open its address, sign in, work, press Save.
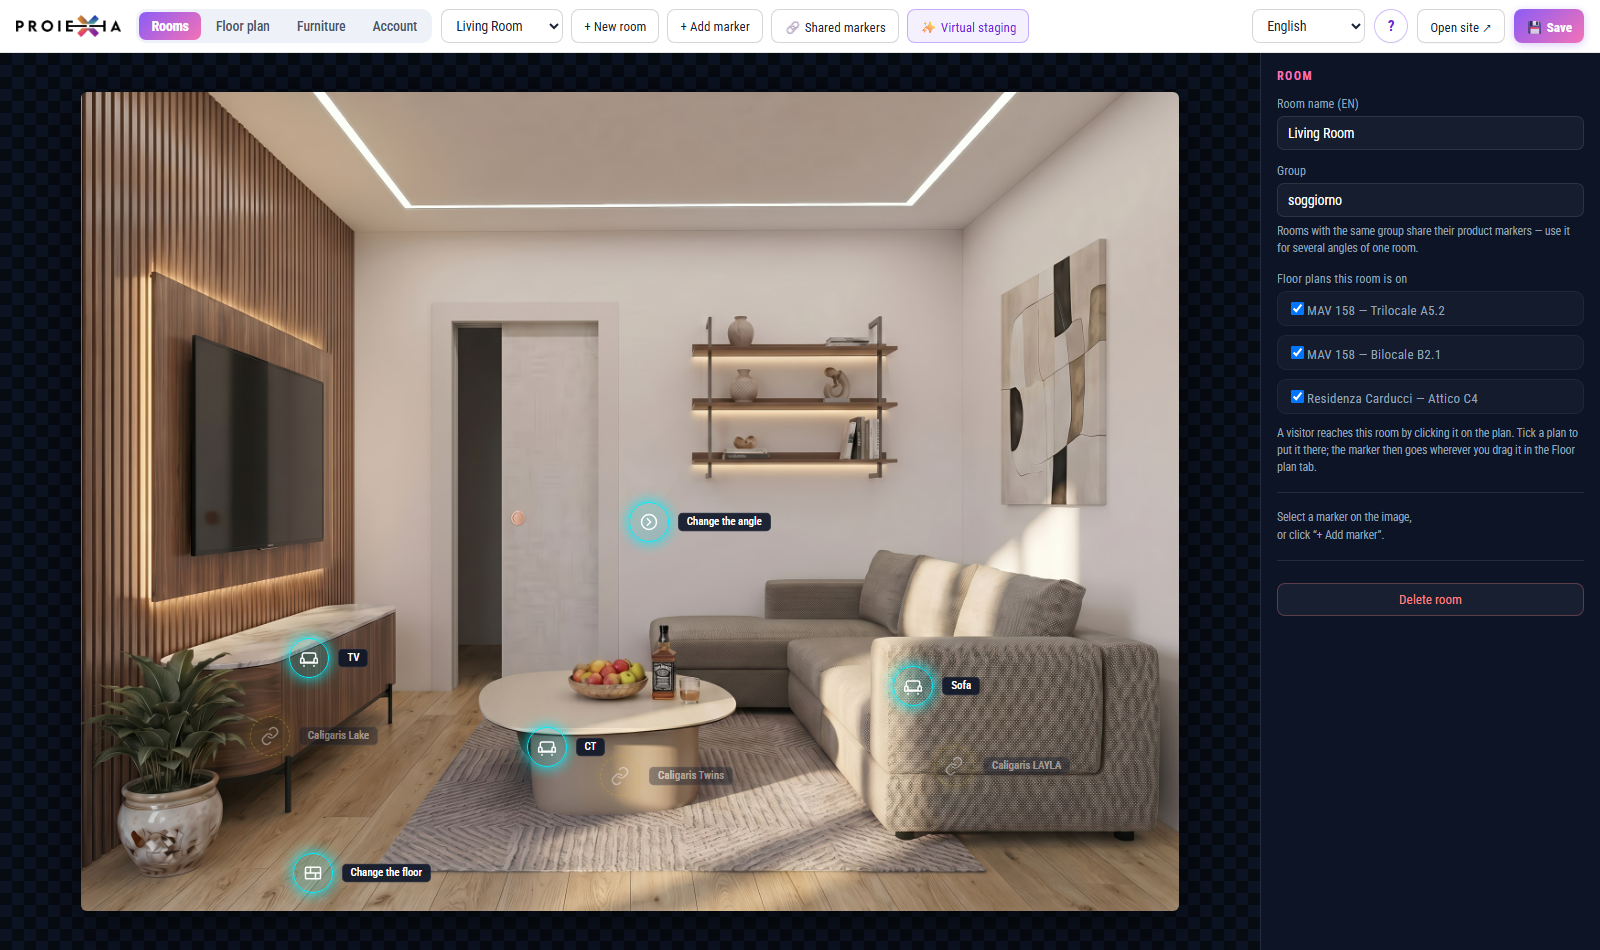
The stage
The middle. The room photograph, the floor plan, or the catalogue — whatever the current tab is about.
The panel
The right-hand column. It always describes the one thing that is selected, and it changes as you click around.
The header
One white row. Where you are, what this tab can do, and — last, because it is the last thing you do — Save.
2Signing in
The editor address is your presentation address with editor.html on
the end — for example https://your-domain.com/invest/editor.html.
It asks for one thing, the editor password, and then opens.
The password protects the editor only. The presentation itself stays open to anyone you send the link to — that is the point of it. You can change the password at any time in the Account tab.
3The header, button by button
One row, always the same shape. The left half says where you are, the right half is the same wherever you are.

Always there
| Control | What it does |
|---|---|
| PROIEXIA logo | Marks the editor. Not a button. |
| Rooms | Opens the room tab: photographs, markers, virtual staging. |
| Floor plan | Opens the plan tab: properties, plans, prices, plan markers. |
| Furniture | Opens the product catalogue. |
| Client links agency | Opens the list of client access links. Present only in the agency edition. |
| Account | The account key, the generations left, and the editor password. |
| Status text | Short confirmations — Saved ✓, Image uploaded ✓, Room added. It fades on its own. |
| Generations chip | How many AI generations the account has left. Hidden when the account is not connected; shows Unlimited when there is no cap. |
| Language | Two things at once: the language the editor speaks to you in, and the language whose texts you are typing. See Languages. |
| Open site ↗ | Opens the presentation in a new tab, from this same folder. Use it to check your work as a visitor sees it. |
| 💾 Save | Writes everything to the server. Nothing is stored until you press it. |
Only on the Rooms tab

| Control | What it does |
|---|---|
| Room list | Picks the room you are editing. Everything below follows it. |
| + New room | Asks for a name and creates an empty room. |
| + Add marker | Drops a new marker in the middle of the photograph. Drag it where it belongs. |
| 🔗 Shared markers | Opens the markers shared by every angle of the same room. See Shared markers. |
| ✨ Virtual staging | Furnishes an empty room with AI. 2 generations |
Only on the Floor plan tab
| Control | What it does |
|---|---|
| Property list | Picks the building or development. |
| + Property | Creates a new property to hold plans. |
| Plan list | Picks the flat or floor within that property. |
| + Plan | Creates a new floor plan under the current property. |
| ✨ 2D → 3D | Turns the drawing into a furnished 3D render. 1 generation |
| ⇋ 2D/3D | Puts a slider over the plan so you can compare drawing and render. Press again (it now reads ⇋ Markers) to go back to editing. |
| + Add marker | Drops a marker on the plan; link it to a room so a visitor can click into it. |
Only on the Furniture and Client links tabs
| Control | What it does |
|---|---|
| + New product | Adds an empty card to the catalogue. |
| Catalogue currency | € EUR or $ USD for every product price. Independent of the price on a floor plan. |
| Client / project agency | The name that identifies a client link in the list. |
| Generations agency | How many AI generations that one link may spend. |
| + Create link agency | Creates the link and copies it into the list below. |
4Languages
One list in the header, two jobs.
Choosing a language in the header does two things at once. It translates the editor itself — labels, buttons, dialogs — and it switches the language of the text you are typing. That is why name fields are labelled Room name (EN), Plan name (IT) and so on: the suffix tells you which language you are filling in right now.
- Type the English name, switch the header to Italiano, type the Italian one. Both are kept.
- Anything you leave empty falls back to English on the visitor's screen, so a half-translated presentation is never a broken one.
- The visitor chooses their own language on the site; it has nothing to do with what you have selected here.
The editor speaks 33 European languages. Prices, sizes and photographs are the same in all of them — only text is per-language.
5Rooms
A room is one photograph plus the markers on it.
Adding a room
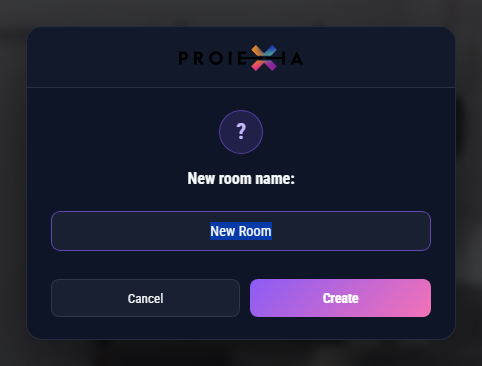
Press + New room. The editor asks for a name and creates the room empty. Every question the editor asks looks like this — a PROIEXIA panel, never a browser box.
The room photograph
A new room has nothing in it, so the stage becomes a drop zone. Drag a photograph onto it or click Choose a file. This picture is the room: markers sit on it, and virtual staging works from it.
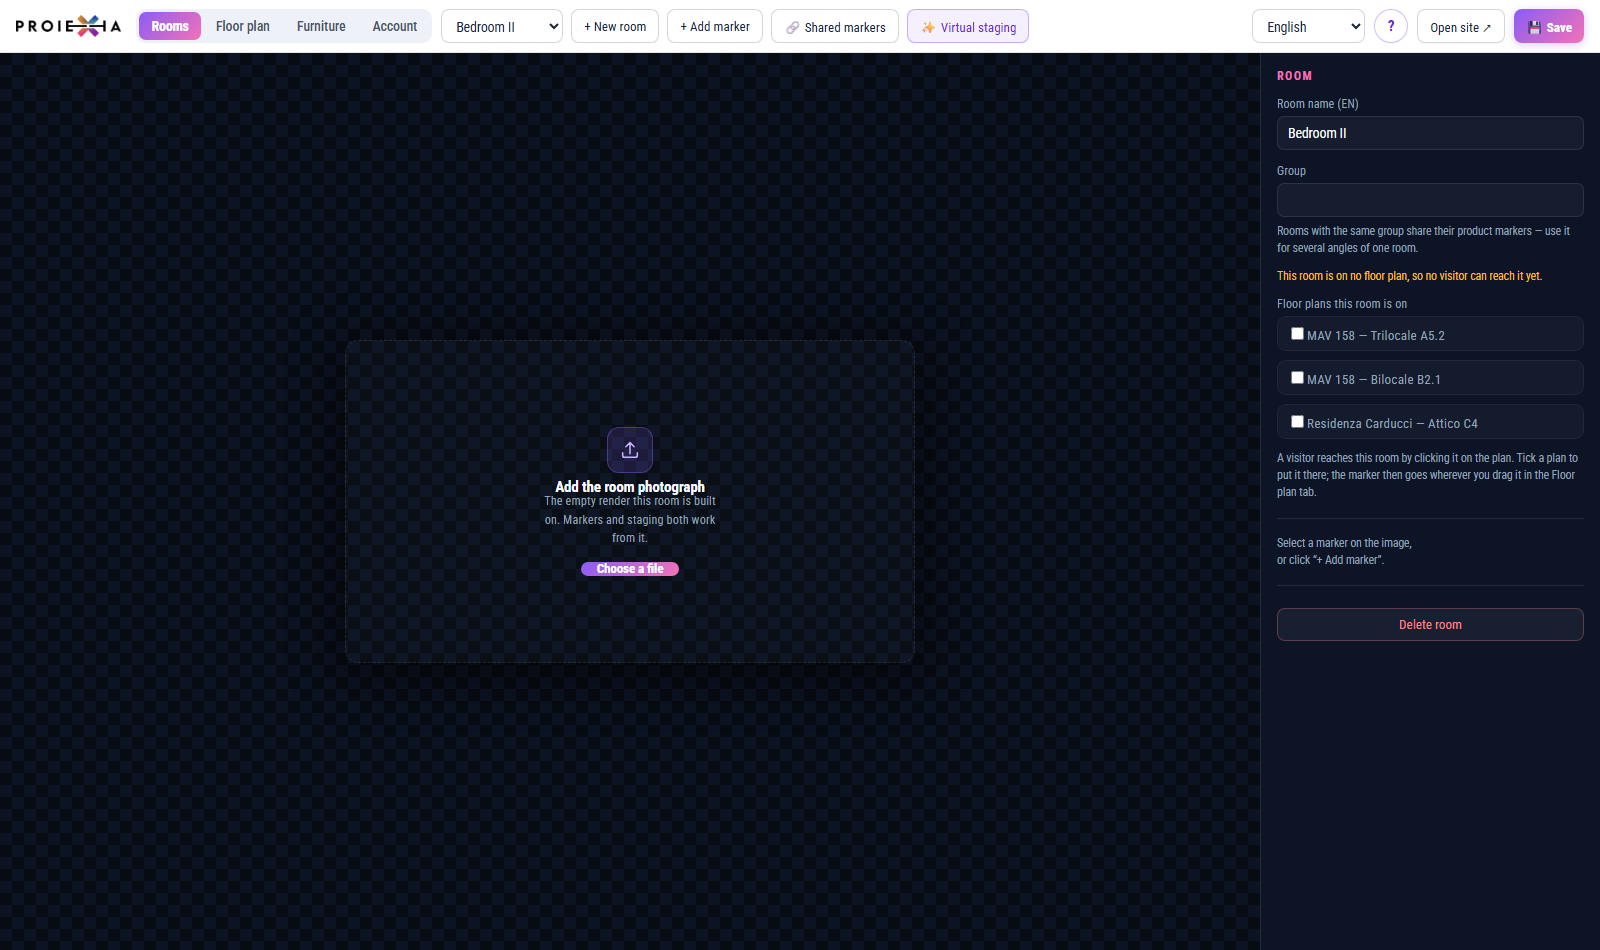
Use the empty render. Furniture that is already in the photograph cannot be removed later. An empty or lightly dressed room gives both the visitor's material swaps and virtual staging something to work with.
The room panel
| Field | What it does |
|---|---|
| Room name | What the visitor reads above the room. Per language. |
| Group | Rooms carrying the same group share their product markers — the way to give one room several camera angles. Leave it empty for a single-angle room. |
| Floor plans this room is on | Tick every plan the room belongs to. Ticking one puts a marker for this room on that plan; drag the marker into place in the Floor plan tab. |
| Delete room | Removes the room and its markers. You are asked first. |
This room is on no floor plan, so no visitor can reach it yet. — the panel says this when nothing is ticked. A room with no plan behind it is invisible on the site, however finished it looks here.
6Markers
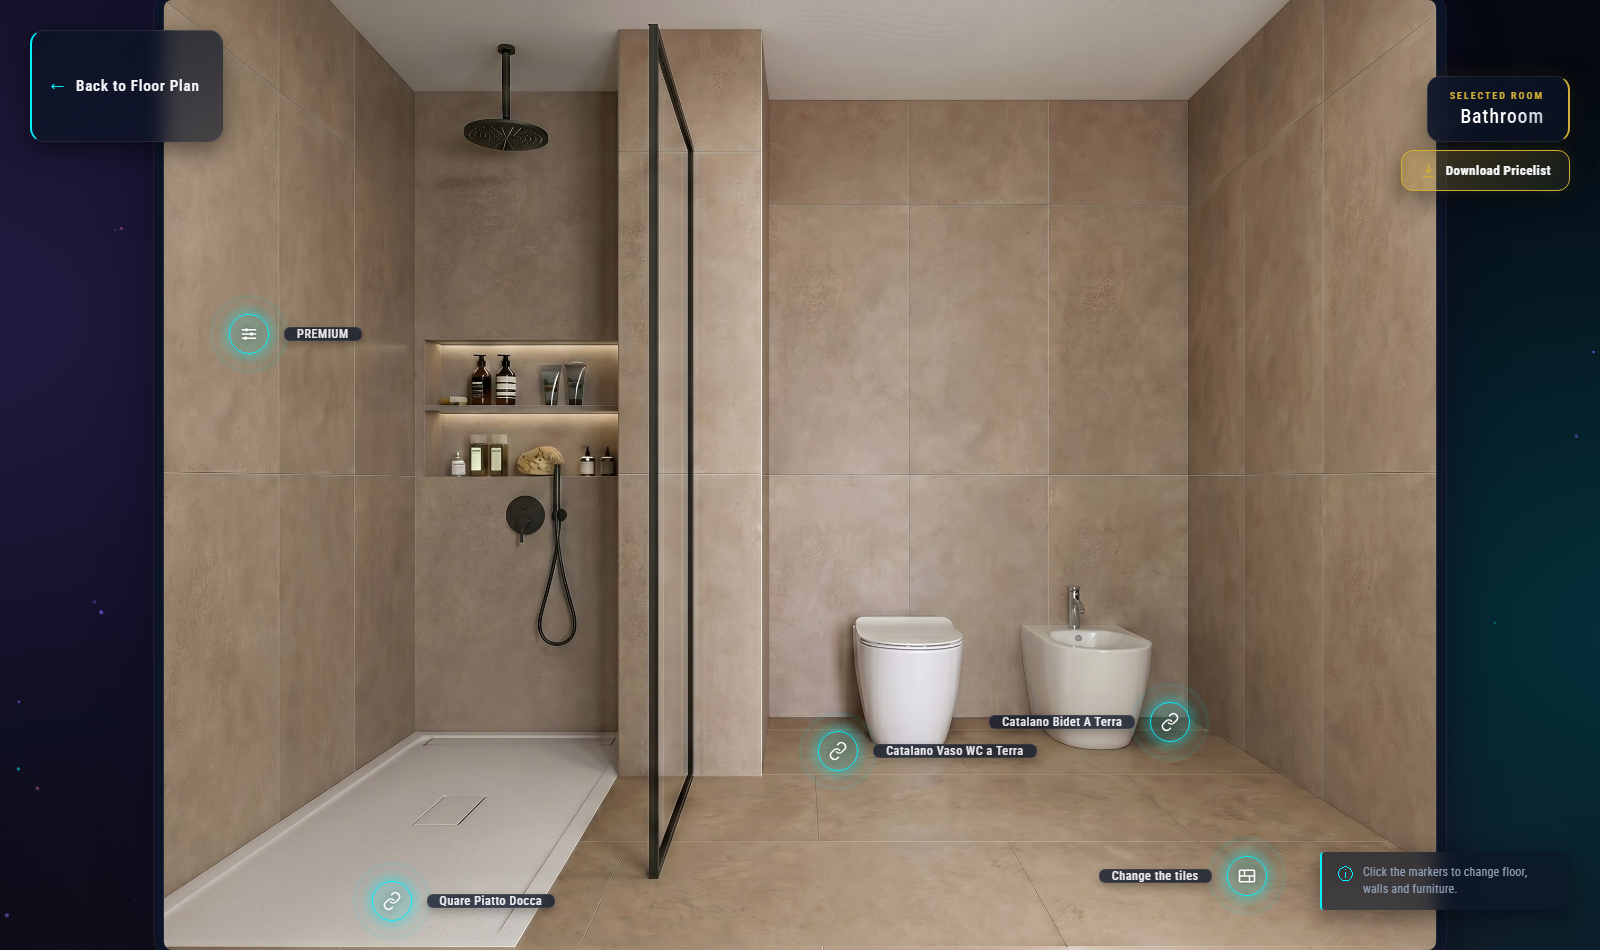
The glowing circles on the photograph. Each one is a thing the visitor can do.
Press + Add marker and one appears in the middle of the picture; drag it onto the floor, the wall, the sofa — wherever it points. Click a marker and the panel on the right describes it.
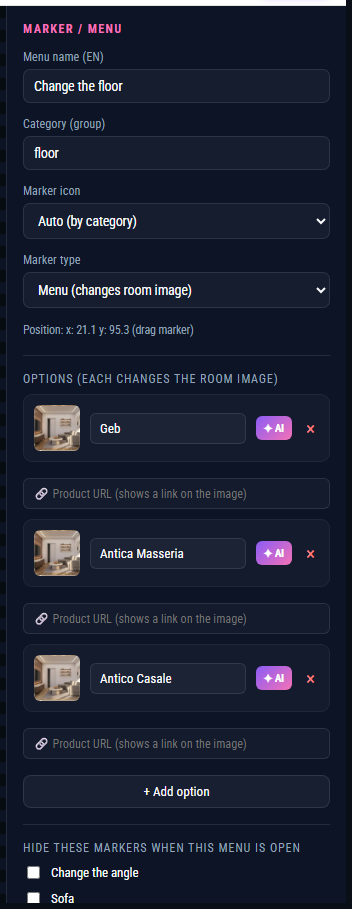
| Field | What it does |
|---|---|
| Menu name | The label on the marker — Change the floor, Change the tiles. Per language. |
| Category (group) | A word like floor or wall. It picks the icon automatically and groups markers that belong together. |
| Marker icon | Auto (by category), or choose it yourself: Floor, Wall, Furniture, Bed, Lighting, Kitchen, Door, Window, Decoration, General. |
| Marker type | What happens on click. Five kinds — see below. |
| Position | Read-out of where the marker sits. Change it by dragging the marker, not by typing. |
| Hide these markers when this menu is open | Tick the markers that would be in the way while this menu is showing. |
| Delete this marker | Removes it and its options. |
The five marker types
| Type | On click, the visitor… |
|---|---|
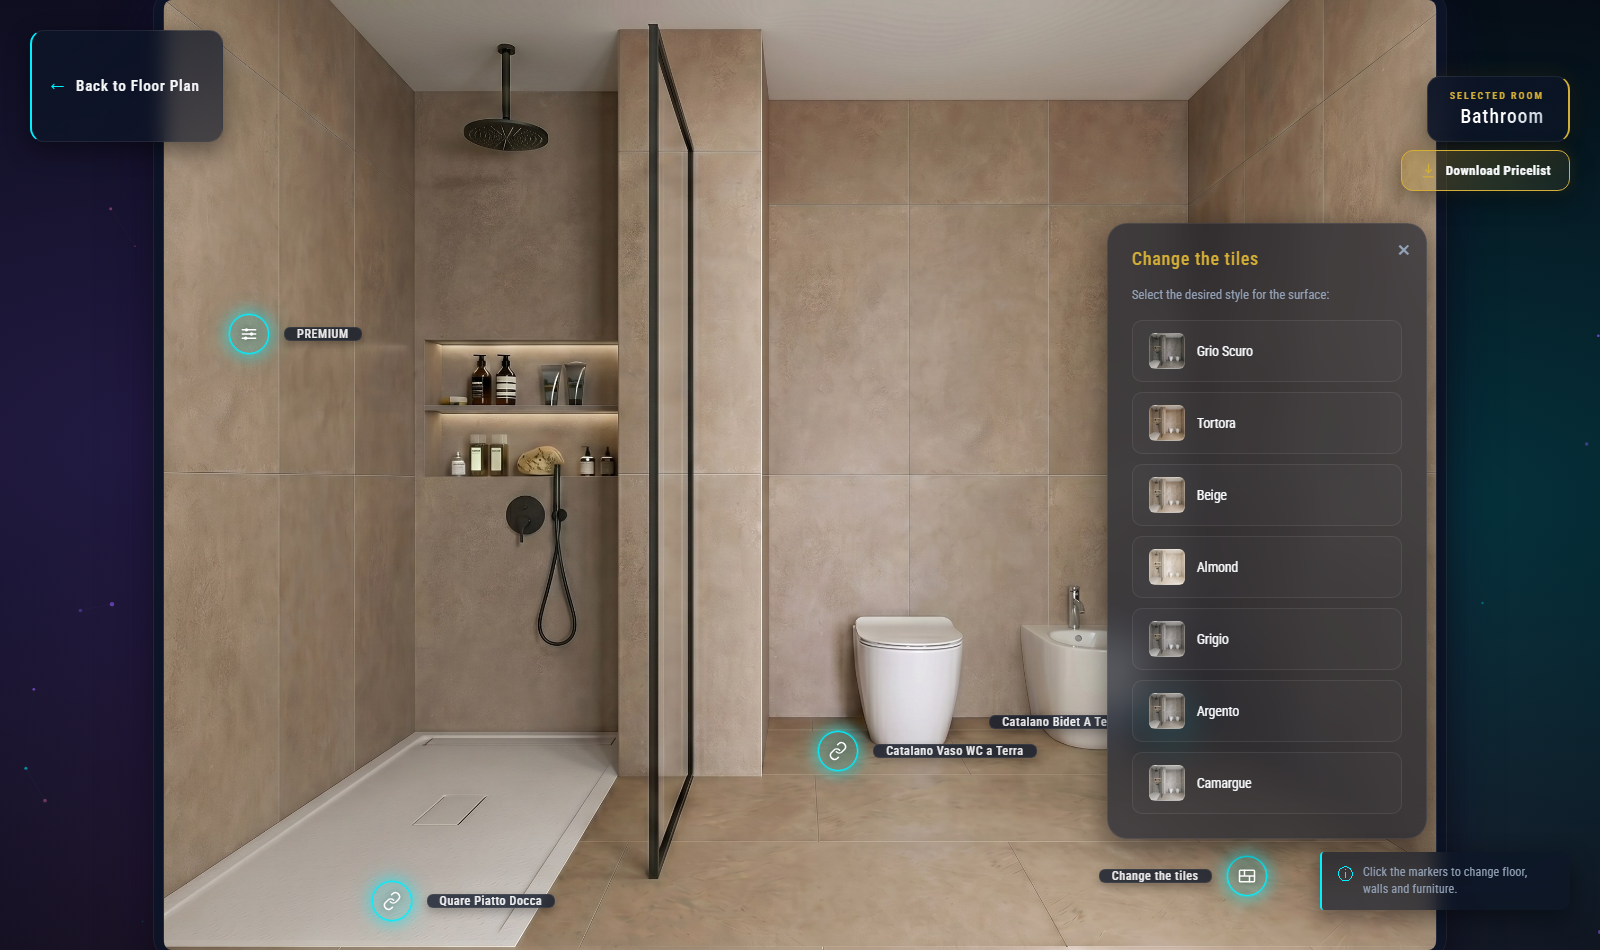
| Menu (changes room image) | …gets a list of options, and picking one swaps the room photograph. This is the material switcher: floors, tiles, wall finishes. |
| Furniture (generated on demand) | …gets your catalogue and places a piece into the photograph. The picture is generated at that moment. 1 generation |
| Link (opens URL) | …is taken to an address you give — the manufacturer's page for that model, for instance. |
| Image (popup) | …sees one picture in a popup. Good for a detail shot or a specification sheet. |
| Change room / view | …is moved to another room. This is how several angles of one room are joined, and how a corridor leads onward. |
Options
A Menu marker holds options, and each option is one finished version of the room photograph. Every option has:
- a thumbnail — click it to upload the picture for that option;
- an option name — Grigio Scuro, Rovere, per language;
- a ✦ AI button, which generates the picture instead of you shooting it;
- a product URL, shown to the visitor as a link on the image;
- a × to delete the option.
+ Add option adds another. The first option in the list is what the visitor sees before touching anything.
Generate with PROIEXIA AI 1 generation
The ✦ AI button beside an option opens the generator. It edits the room photograph you already have — the geometry, the light and the camera stay; only the surface you name changes.
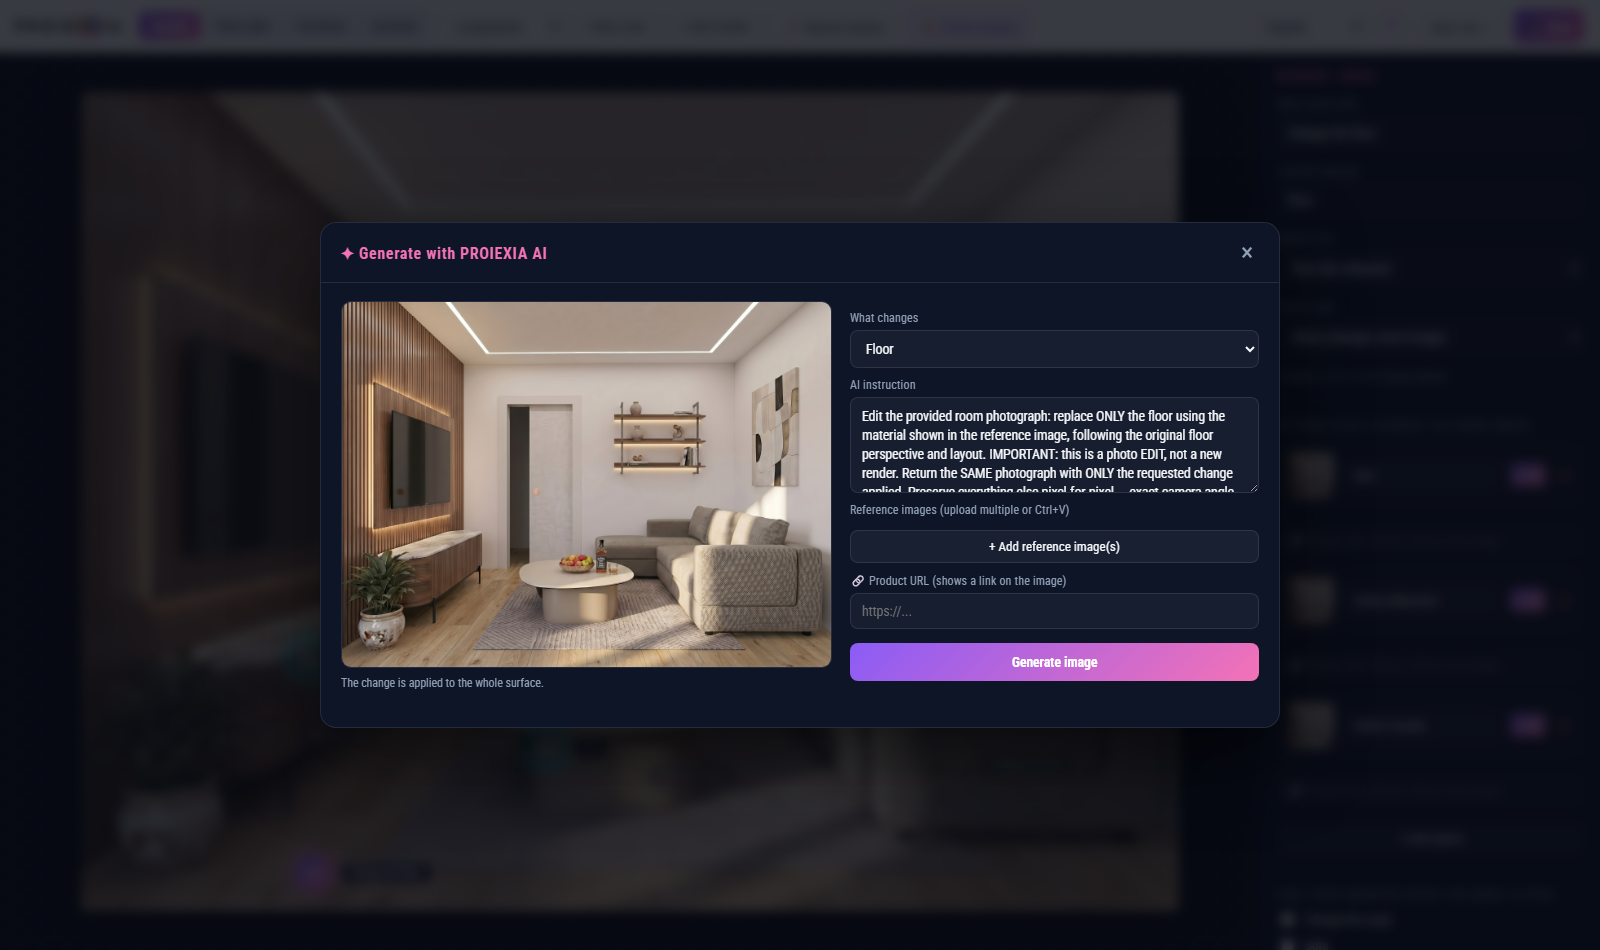
| Control | What it does |
|---|---|
| What changes | Floor, Walls, Ceiling, Walls + Floor, or Selected item(s). |
| Selected item(s) — draw on image | Choose this and drag a rectangle over each piece you want replaced. Everything outside your rectangles is left untouched. |
| AI instruction | The wording sent to the engine. It is filled in for you and already says edit this photograph, do not re-render it — extend it rather than replacing it. |
| Reference images | The material you want: a tile sample, a fabric, a catalogue photo. Upload several, or paste with Ctrl+V. This is what makes the result match a real product. |
| Product URL | Optional link shown to the visitor on the finished image. |
| Generate image | Runs it. Up to a minute; the result lands on the option's thumbnail. |
Furniture markers
A Furniture marker does not carry finished pictures. It carries a position and a list of products, and the picture is made when the visitor asks for it.
| Field | What it does |
|---|---|
| Position on the photo → Mark position | Opens the photograph so you can drag a rectangle around the piece that gets replaced. Save position keeps it, Clear starts again. Until it is marked, the panel says Not marked yet — the visitor cannot generate until you mark it. |
| Products offered here | Your catalogue, grouped by category, with a tick beside each product. The all toggle beside a category heading takes the whole category at once. |
7Shared markers
Define a product once, show it in every angle of the room.
Give two rooms the same Group and they become two angles of one room. Their product markers are then shared: the sofa you describe once appears in both, and you only drag it into position in each.
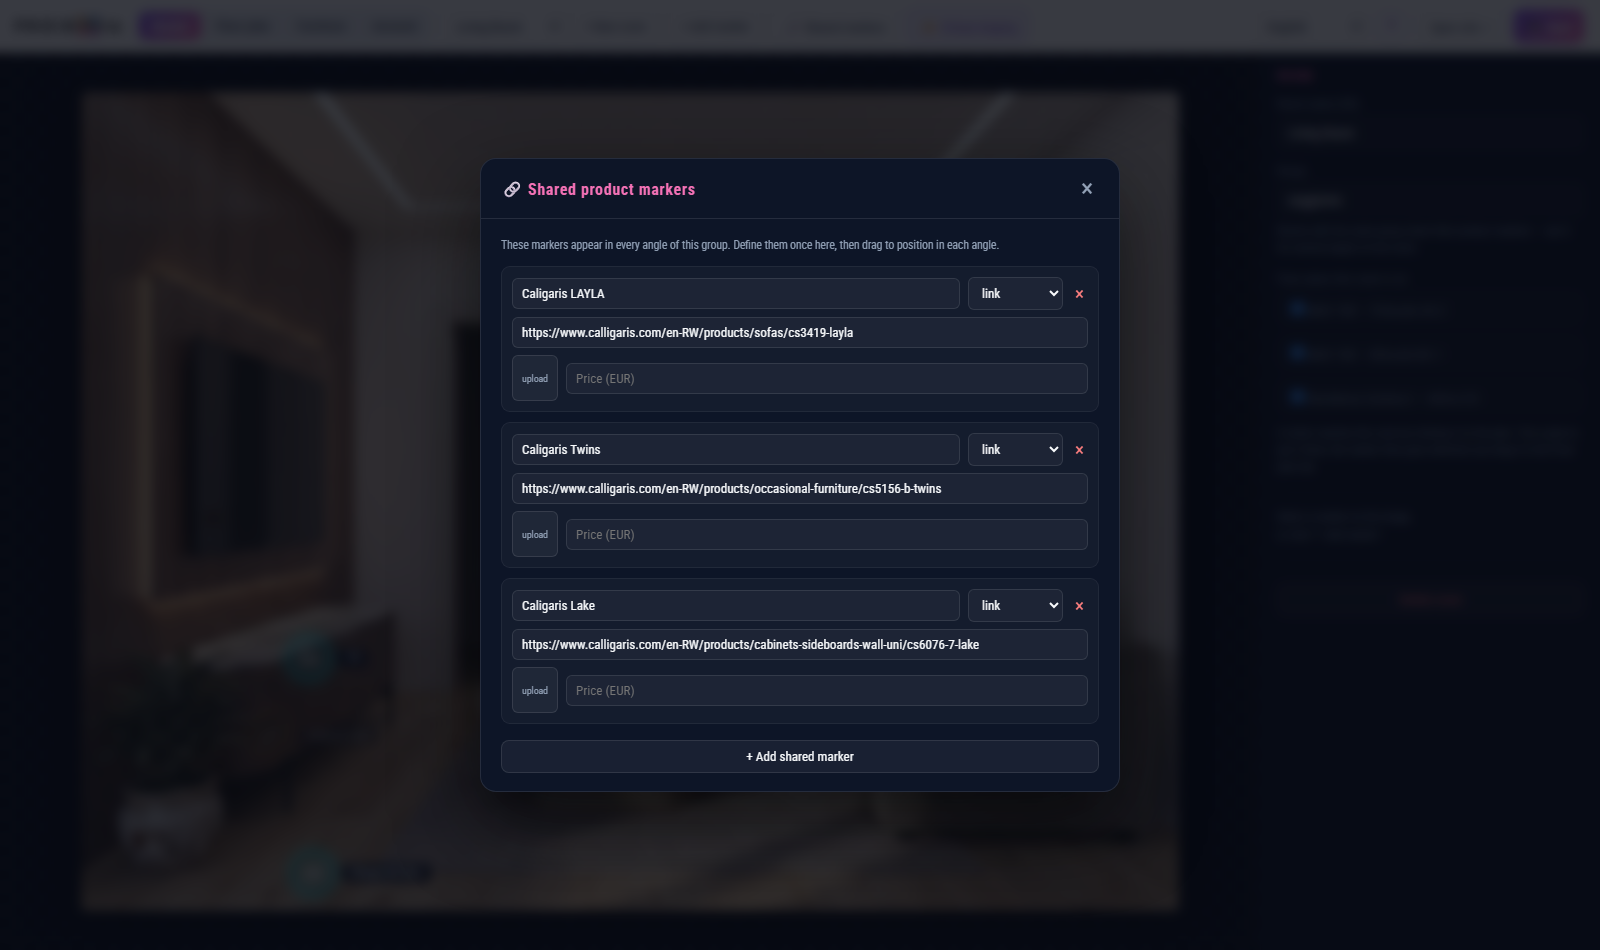
- + Add shared marker — one more product for the whole group.
- upload — the picture shown in the popup.
- Back on the photograph, select a shared marker to drag it into place in that angle, or tick Hide in this angle if it cannot be seen from here.
No group set? The button tells you so: set a Group on the room first — a
plain word such as living — and give the same word to every angle.
8Virtual staging 1–2 generations
Empty a room, furnish one, or do both in turn. Either way the room itself is kept exactly as photographed — only what stands in it changes.
Open it with ✨ Virtual staging on the Rooms tab.
Two jobs, one screen
At the top of the settings are Furnish and Empty the room. Furnishing puts a room into a bare photograph; emptying takes one out. Most flats are photographed lived-in, so the two are usually done in that order: empty it first, then furnish the result in the style the buyer is looking for.
Emptying takes out the furniture, rugs, curtains and blinds, pictures, mirrors, televisions and their brackets, shelves, plants, cushions, bedding, books — and everything else standing on the floor, hanging on the walls or sitting on a surface.
It leaves the walls, ceiling and floor in their own materials, the windows and doors, the skirting and cornices, the radiators, sockets and switches, the wired-in lighting, and the fitted kitchen, worktops, built-in wardrobes and fireplace — everything that is sold with the property.
What was hidden is rebuilt. The floor runs on under where the rug was, in the same boards and the same direction. The wall behind a picture is paint — no hook, no nail hole, no lighter rectangle where it hung. Shadows and reflections leave with the things that cast them.
Style, What is on it, the focal wall and the catalogue disappear when you choose Empty the room: nothing is going in for them to describe. Anything else stays, for the exceptions — leave the curtains up, take the fitted wardrobe out too.
Emptying a room costs one generation; furnishing one costs two. Composing a room is invention — where the sofa goes, what the rug is. Emptying one is an edit.
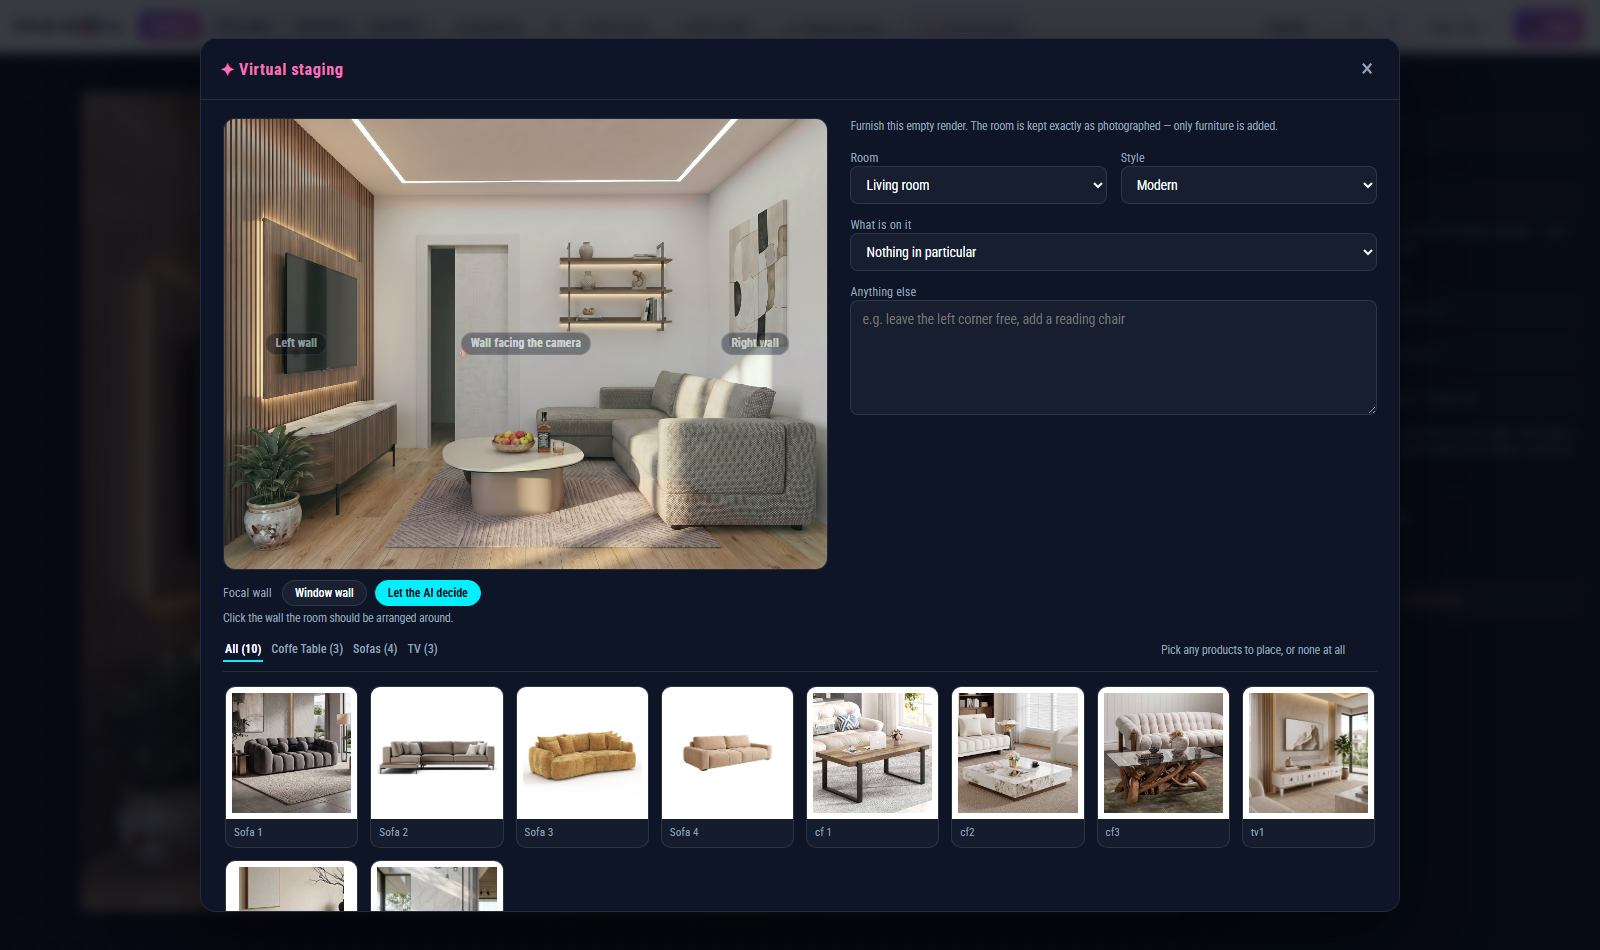
The photograph, left
Hover the picture and it divides into wall zones. Click the wall the room should be arranged around — the television wall, the wall with the window. The chip underneath then reads Focal wall: …. If you have no preference, click Let the AI decide.
| Zone | Which wall |
|---|---|
| Wall facing the camera | The far end of the room, straight ahead. |
| Left wall | The wall down the left of the photograph. |
| Right wall | The wall down the right. |
| Window wall | The wall with the window or the glass door. |
| Let the AI decide | Whichever wall the photograph already makes the natural focus. |
The settings, right
| Field | What it does |
|---|---|
| Room | What the room is, in seven groups — Living, Kitchen & dining, Sleeping, Bathrooms, Work & leisure, Hall & service, Outdoor. Thirty-seven kinds, including the mixed ones: Living + dining (open plan), Kitchen + dining, Kitchen + dining + living. |
| Style | Modern, Scandinavian, Minimal, Mid-century, Contemporary, Japandi, Industrial, Coastal, Classic, Farmhouse. |
| What is on it | What stands on the focal wall. The list follows the room you chose — a television or a fireplace for a living room, a headboard or fitted wardrobes for a bedroom, a cooker and hood or an island for a kitchen, a vanity or a bathtub for a bathroom. |
| Anything else | Free text for the rest: leave the left corner free, add a reading chair. |
The catalogue, below
Your products, in tabs by category, with All (n) first. Click as many as you like — the count reads {n} selected and Clear empties it. Chosen products are placed as they are, in the model you sell. Choose none and the AI furnishes the room itself.
Running it
Stage the room asks you to confirm the cost, then takes 20 to 40 seconds. When it is done you get a slider: the empty room on the left, the furnished one on the right.
- Use this image — the staged photograph becomes the room's picture.
- Keep the empty one — nothing changes and the room stays as it was.
Either job is one request to the image engine — two generations to furnish, one to empty. The result comes back at the size configured on the server and in the same shape as your photograph — nothing is cropped. Press Save afterwards to keep it.
9Floor plan
The property, its flats, their prices, and the way into each room.
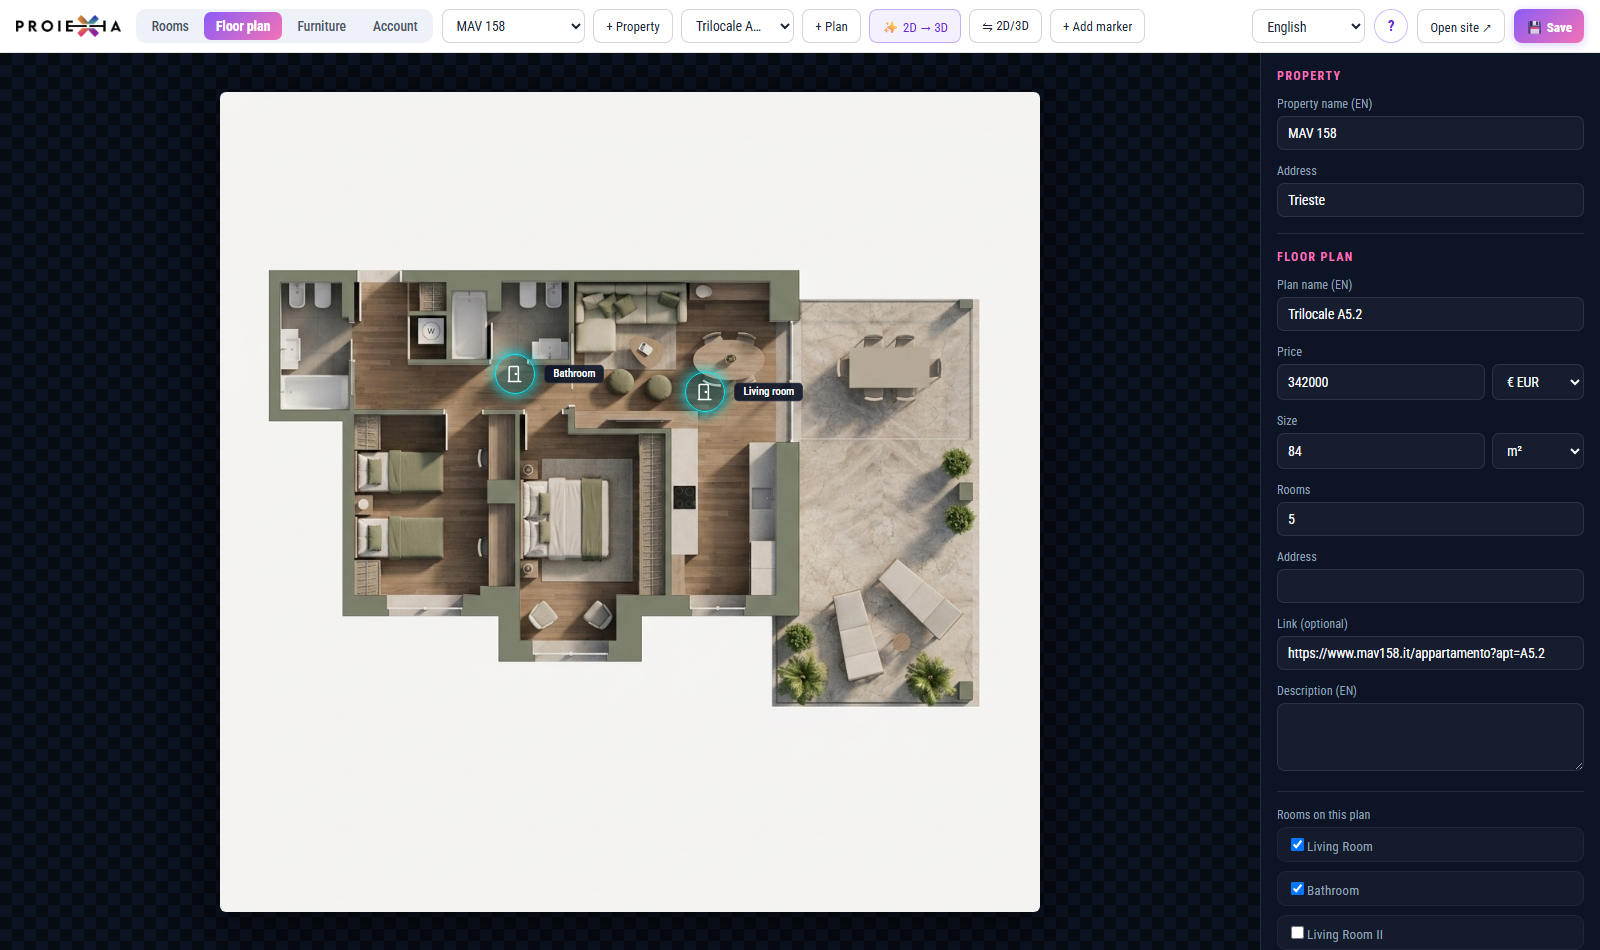
Properties and plans
A property is the building or development; a plan is one flat or one floor inside it. Create them with + Property and + Plan; the two lists in the header pick which you are editing.
The two images
Each plan takes two pictures, each with its own drop zone:
- Add the 2D floor plan — the drawing. It is also what a 3D render is made from.
- Add the 3D render — optional, or make one with ✨ 2D → 3D.
✨ 2D → 3D reads the drawing and produces a furnished render of it, 20 to 40 seconds, 1 generation. ⇋ 2D/3D then lays a slider over the two so you can check the render against the drawing; the button turns into ⇋ Markers to take you back.
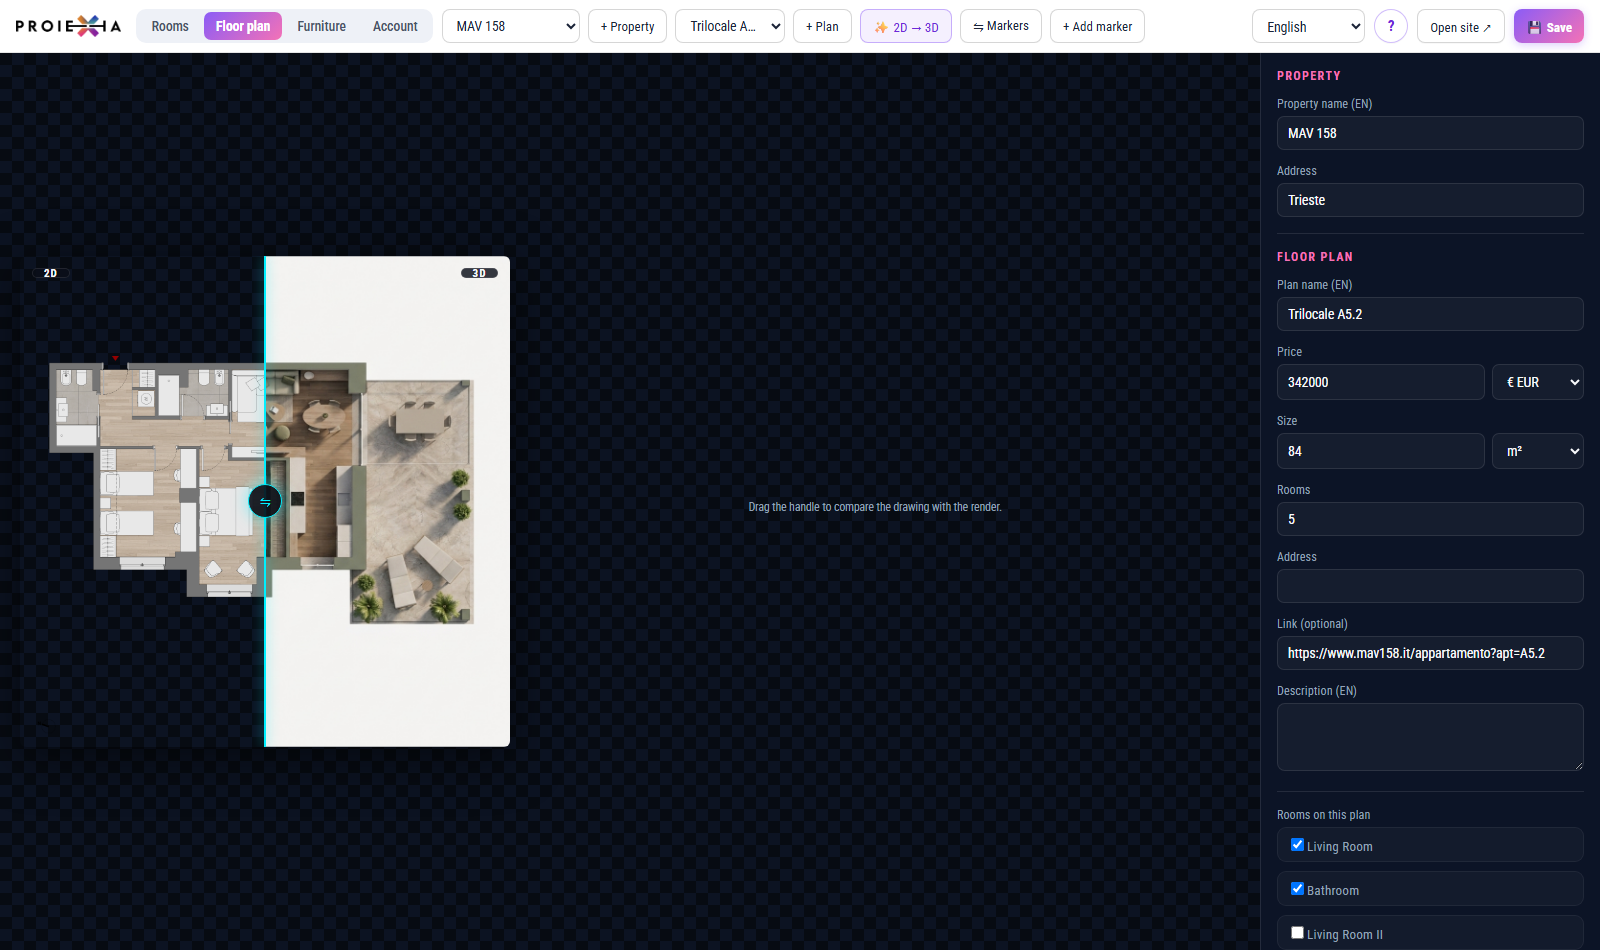
The plan panel
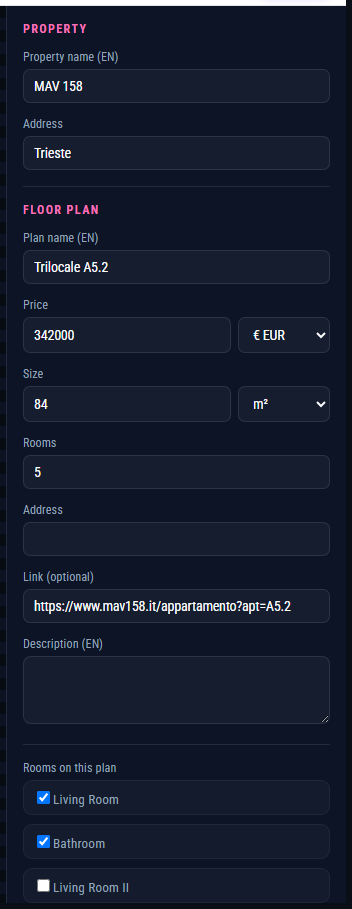
| Field | What it does |
|---|---|
| Property name | Heading above the group of plans. Per language. |
| Address | Where the property is. There is a second address on the plan itself for when a flat needs its own. |
| Plan name | The flat — Trilocale A5.2. Per language. |
| Price | The asking price, with its own currency: € EUR or $ USD. |
| Size | The floor area, in m² or sq ft. |
| Rooms | How many rooms the flat has. |
| Link (optional) | Address behind the call-to-action button — your listing, a quote form. |
| Description | The paragraph under the plan. Per language. |
| Rooms on this plan | The same link as on the room, from the other end. Tick a room and it gets a marker in the middle of the plan; drag it onto the right room. |
| Delete this plan / property | Removes it. Deleting a property takes all of its plans with it. You are asked first. |
Plan markers
Click a marker on the plan and the panel gives you its Name and the Linked room it opens. That link is the way in: a visitor clicks the circle on the plan and lands in the room.
10Furniture catalogue
The products a visitor can put into a room.
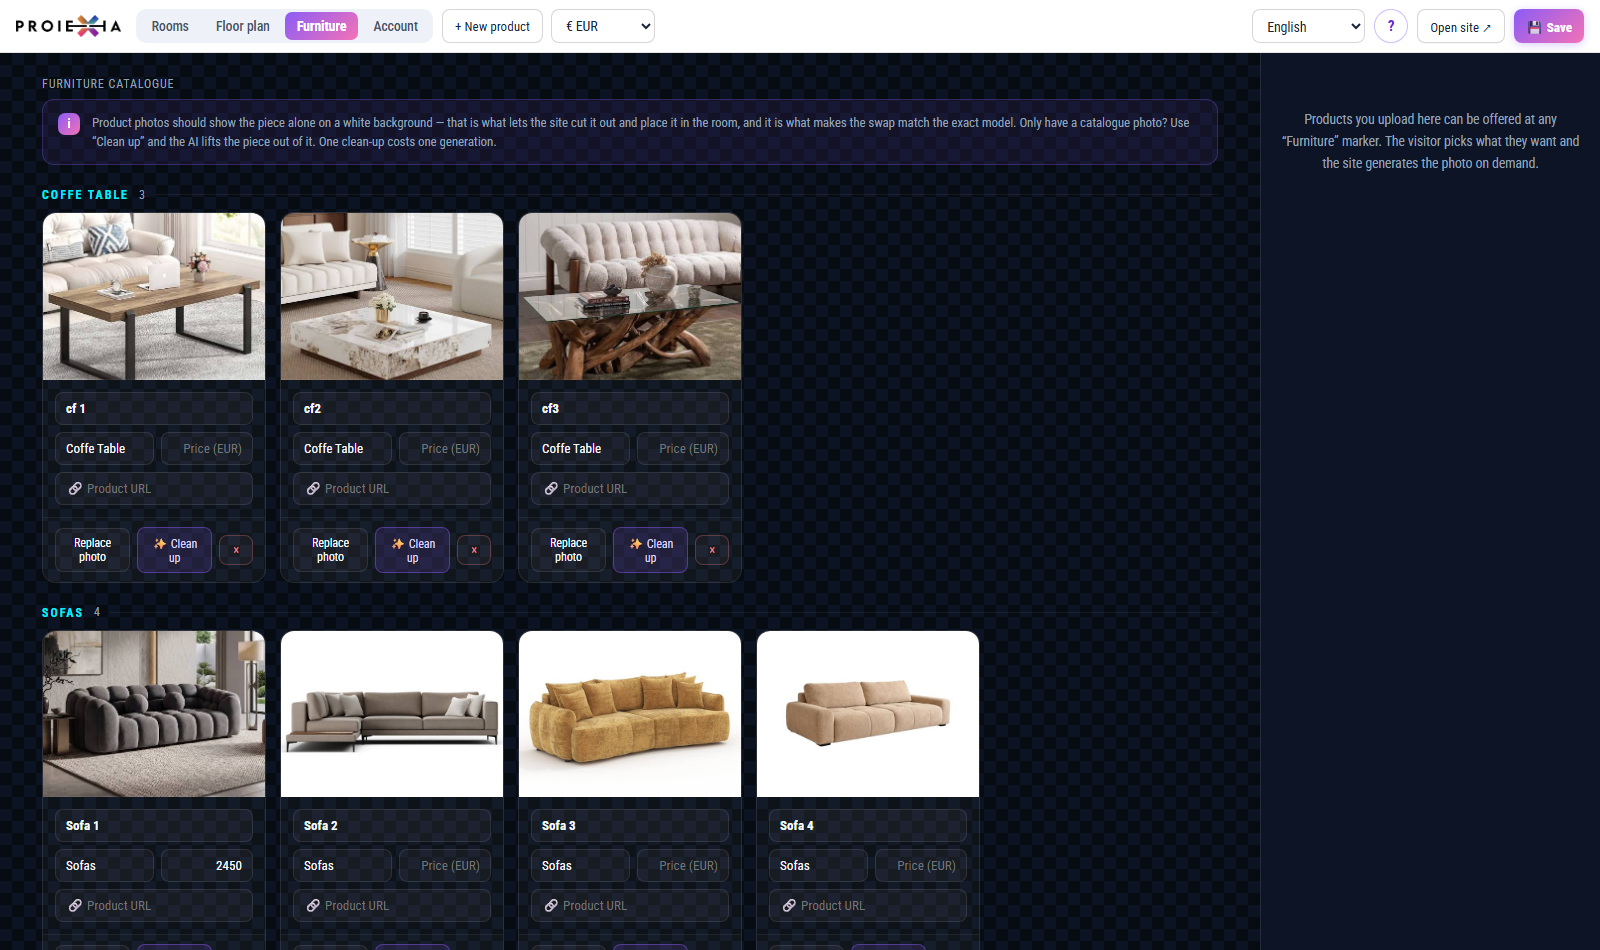
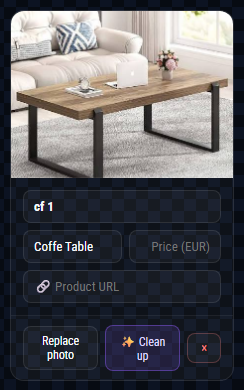
| Control | What it does |
|---|---|
| Photograph | Click it to upload. Best is the piece alone on a white background. |
| ✨ Clean up | Lifts the piece out of a catalogue photograph and puts it on white. 1 generation |
| Product name | What the visitor reads. Per language. |
| Category | Free text — sofas, tables. It groups the product in the filter, in the staging tabs and in the marker list. |
| Price | In the catalogue currency chosen in the header. |
| Product URL | Shown to the visitor as a link. |
| × | Deletes the product. You are asked first. |
| All categories | Filters the grid down to one category. |
Why the white background matters. A cut-out is what lets the engine place the exact model you sell into a photograph. A product shot in someone else's living room brings that living room with it. Clean up exists for when the supplier gave you nothing better.
11Client links agency edition
One link per client, each with its own pool of generations.
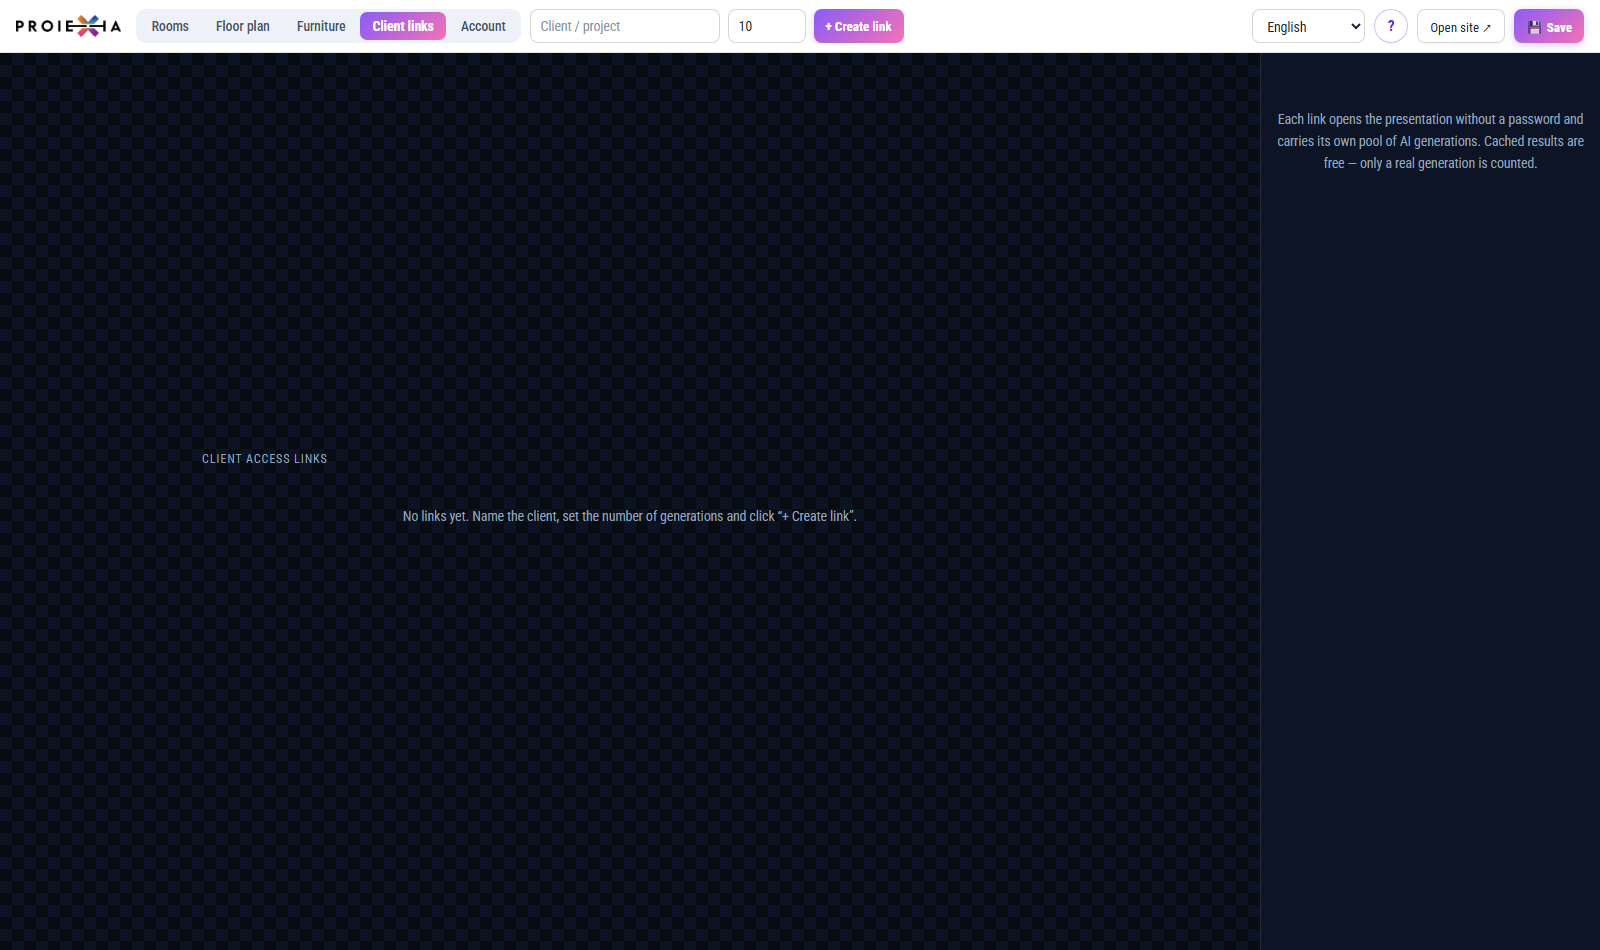
| Control | What it does |
|---|---|
| Copy link | Puts the address on the clipboard; it confirms with Copied ✓. |
| used / left | How many generations that link has spent and how many remain. |
| Active / Disabled | Switches the link off without deleting it. A disabled link stops opening at once. |
| Reset counter | Puts the spent count back to zero and gives the link its full quota again. |
| Delete | Removes it. Anyone holding it loses access. |
| never opened / last used | Whether the client has been in, and when. |
A result that has been generated once is cached and free from then on. Only a genuinely new image is counted against the quota, so a client who explores the same three floors all afternoon spends very little.
12Account
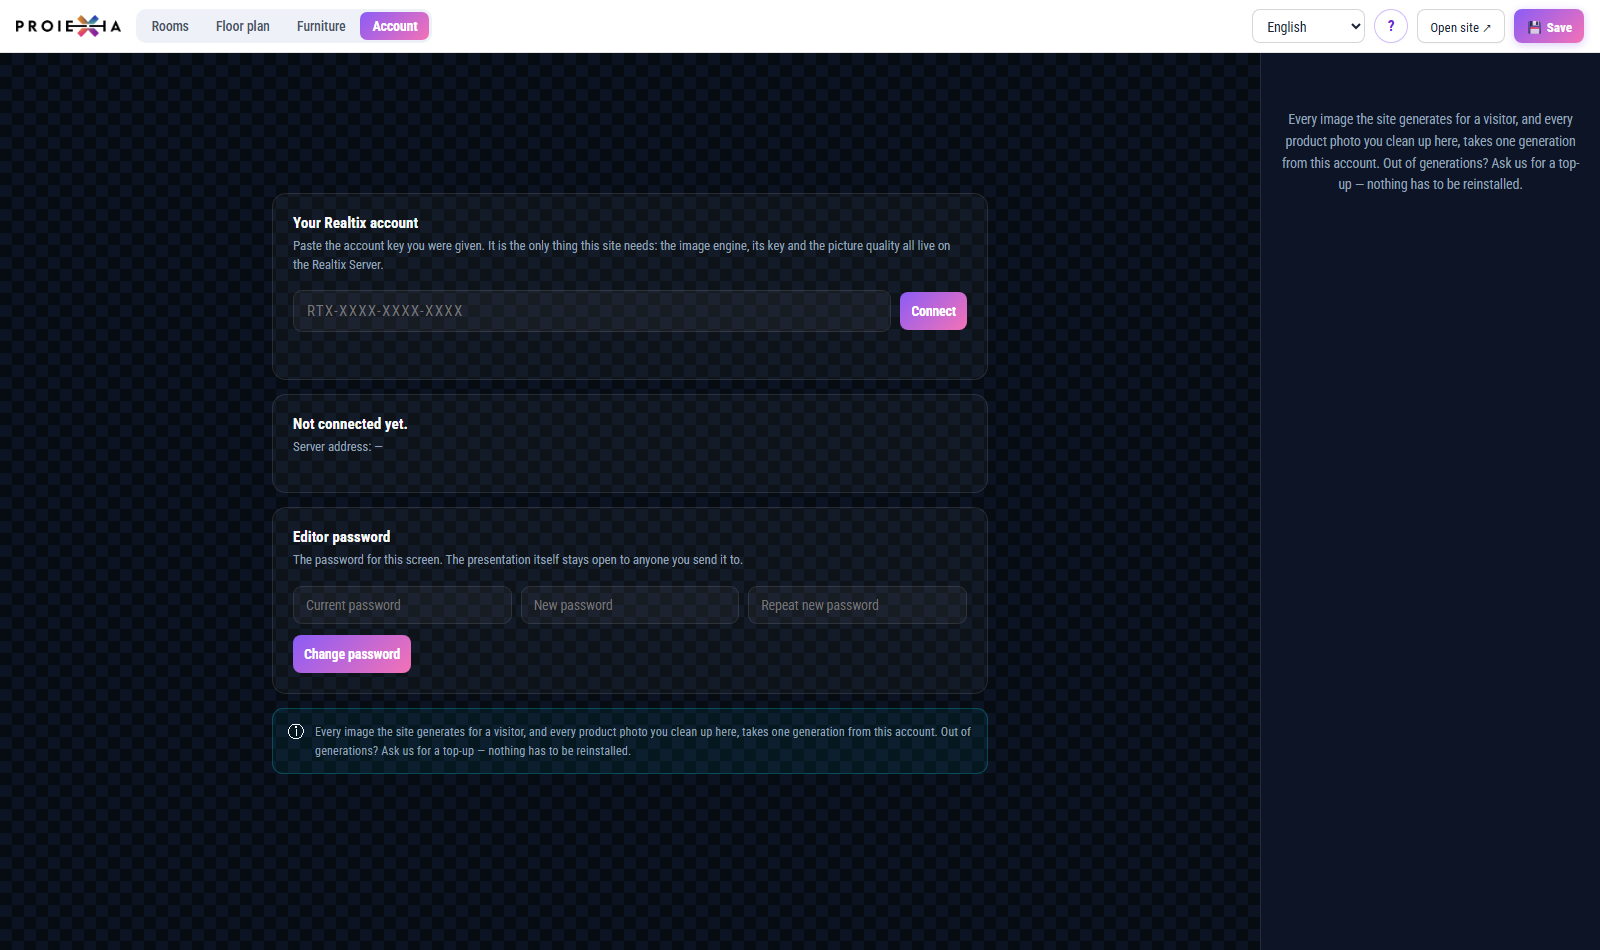
| Field | What it does |
|---|---|
| Account key | The key you were given, in the form RTX-XXXX-XXXX-XXXX. Connect checks it against the Realtix Server. |
| Account, Generations left, Used | Who the key belongs to and what it has spent. Unlimited means there is no cap. |
| Image quality | The output size set on the server. It is not changed from here. |
| Valid until | When the account expires, or No end date. |
| Server address | The Realtix Server this site talks to. |
| Editor password | Current password, the new one twice, then Change password. At least 8 characters. |
The image engine and its key live on the Realtix Server, not in this site. That is why a top-up needs nothing reinstalled — the count simply goes up.
13Dialogs and messages
The editor never uses a browser box.
Every question and every failure appears in the same PROIEXIA panel, so a refusal is impossible to miss and always says what actually went wrong.
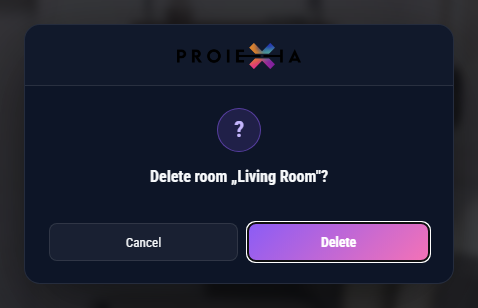
- Yes, go ahead / Create / Delete — the coloured button always carries the consequence.
- Cancel, the Esc key, or a click outside the panel — nothing happens.
- Short confirmations do not interrupt: they appear as status text in the header and fade — Saved ✓, Image uploaded ✓, 3D render ready.
14What costs a generation
| Action | Where | Cost |
|---|---|---|
| ✦ AI on an option | Rooms → marker → option | 1 |
| ✨ Clean up | Furniture → product card | 1 |
| ✨ 2D → 3D | Floor plan | 1 |
| ✨ Virtual staging | Rooms | 2 |
| A visitor placing furniture | The presentation | 1 |
| Anything generated once already | Anywhere | free |
| Uploading, typing, dragging, saving | Everywhere | free |
The chip in the header shows what is left. When an account runs out, the editor says so in a dialog and nothing is spent.
15What the visitor sees
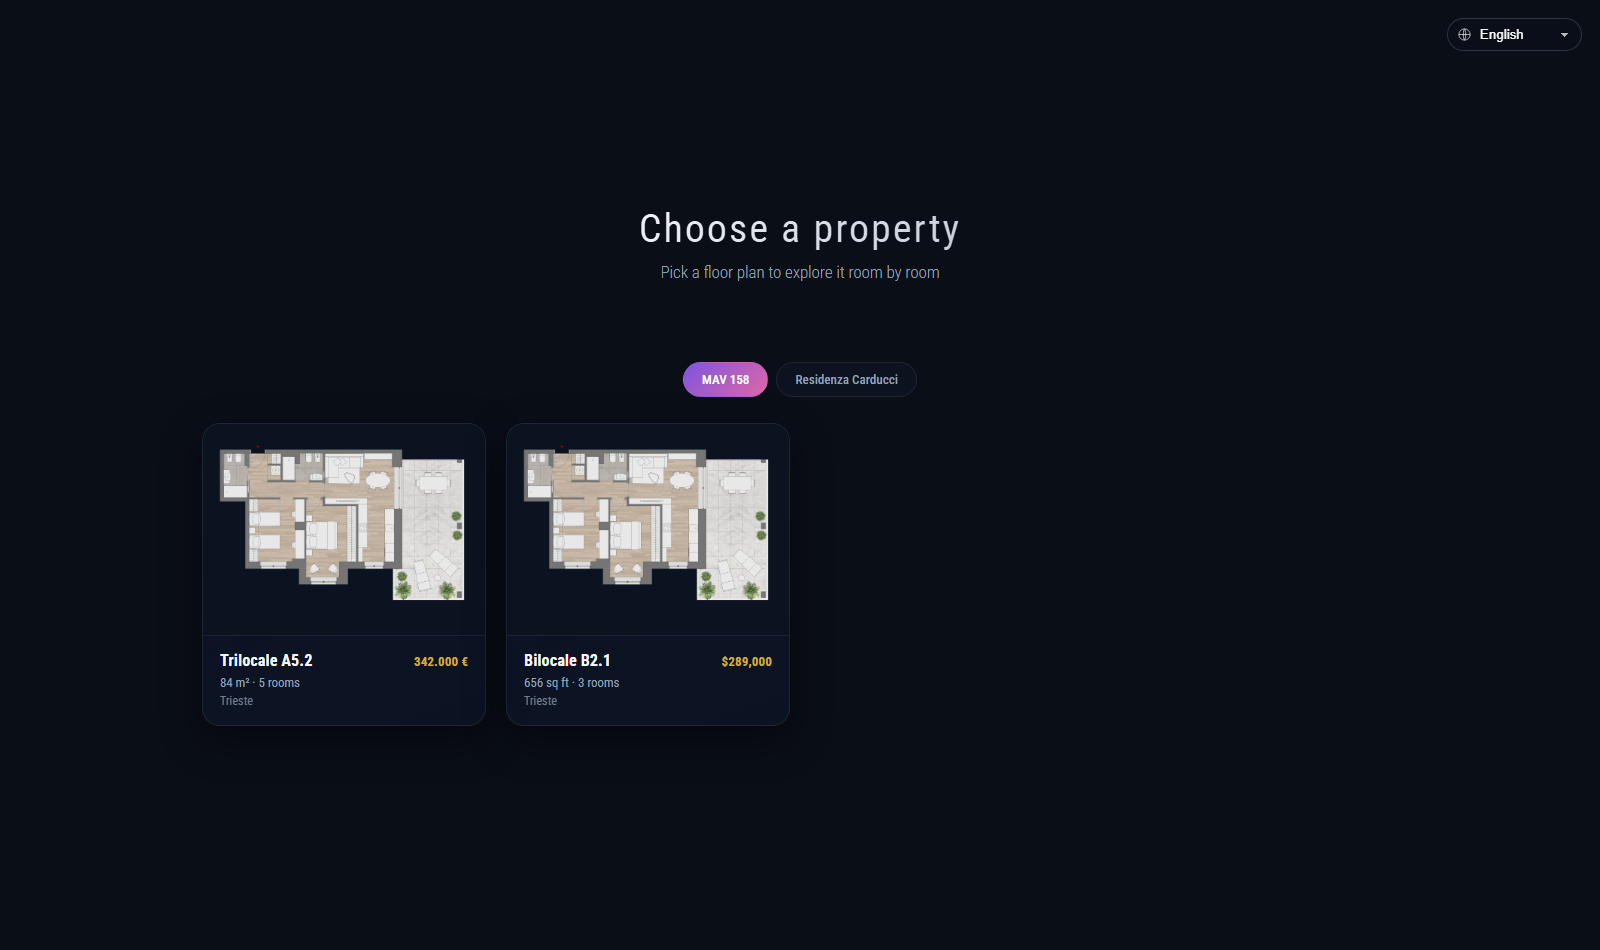
Worth knowing, because every screen here is the far side of something you set.
16A complete walk-through
One property, from nothing to a link you can send.
- Connect the account. Account tab, paste the key, Connect. The generations chip appears in the header.
- Create the property and its plan. Floor plan tab → + Property, then + Plan.
- Upload the drawing into the 2D drop zone. If you want a render and have none, press ✨ 2D → 3D.
- Fill in the plan. Name, price and currency, size and unit, rooms, address, description, link.
- Create the rooms. Rooms tab → + New room, then drop the photograph into the empty room.
- Join room and plan. Tick the plan under Floor plans this room is on — or tick the room on the plan's own panel — then drag the marker onto the right room in the drawing.
- Furnish an empty room with ✨ Virtual staging if the render came back bare.
- Fill the catalogue. Furniture tab → + New product, cut-out photo, name, category, price, link.
- Add the markers. + Add marker, drag it into place, choose the type, add options — uploaded, or made with ✦ AI.
- Translate. Switch the header language and go back over the name and description fields.
- Press Save, then Open site ↗ and walk the presentation as a buyer would.
- Send it. The plain address, or — in the agency edition — a client link with its own quota.
17If something goes wrong
| What you see | What it means |
|---|---|
| This room is on no floor plan | Nothing is ticked under Floor plans this room is on. Until one is, no visitor can reach the room. |
| Not marked yet | A furniture marker with no rectangle. Press Mark position and drag one round the piece. |
| That image is missing | The file behind the picture is gone from the server. Drop a new one into the same place. |
| This plan has no 3D render yet | ⇋ 2D/3D has nothing to compare. Upload a render or press ✨ 2D → 3D. |
| Upload the 2D plan first | ✨ 2D → 3D works from the drawing; there is none yet. |
| This room has no base image yet | Virtual staging needs the room photograph. Drop it in first. |
| Virtual staging needs 2 generations… | The account is short. Ask for a top-up; nothing has to be reinstalled. |
| That key was not accepted | The account key is wrong, expired, or the Realtix Server cannot be reached. |
| Set a Group for this room first | Shared markers need a group name that every angle of the room carries. |
| Your work seems to have vanished | It was never saved. The editor holds changes in the page until Save; a reload before that discards them. |
PROIEXIA — interactive property presentation. This manual describes the editor as it ships; screenshots are taken from the running application.